Wednesday, May 30, 2012

Portobello Mushroom Parmesan

Mushrooms are the perfect food for a vegetarian.
They are super flavorful, meaty and they eat like a cut of meat.
There's texture there that's hard to find in most other vegetables.
They are simply delightful.
Now take that all glorious portobello mushroom-ness, smother it in some marinara sauce and melty, gooey cheese and we've just reached a whole different universe of deliciousity.
What?
Is that not a word?
It is... like Fabulosity.
You know, delish-eee-osity.
Ya, it's a word.
for sure.


Unfortunately, these are another sad lot of pictures to share with you for this post.
The thing is, I'm normally taking pictures of my dinners AS I am plating them up for us all to eat and it's always so rush rush.
I take my steaming hot plate of food to a spot where I am searching for some damn light
and ...
well...
it doesn't always turn out like I plan it in my head.
I'm waiting for the big guys at Apple or Microsoft to come out with some device that you can smell or taste through the computer screen.
Then I won't have to feel so ashamed of my sad sally pics and just the smells and tastes alone
 will reel you in.


Tonight I made this delicious meal for the family.
  Well, I made chicken parmesan for the boys and the mushroom parmesan for myself but as I was devouring my perfectly roasted mushrooms, I couldn't help but feel the eyeballs on my plate.
Now my man loves his meat, but he was obviously jelly of my vegetarian plate.
He wanted him a taste of the deliciousity (new word of the day).
I broke him off a bit of mine and he LOVED it.
I mean LOVED.
He was mmmmm-ing all over the place.
I mean, really...
what's not to love, is all I'm saying. 


I started out by cleaning the mushrooms.
You can take the little stem off or leave it on if you like.
Take a damp paper towel and gently wipe the caps of any dirt or any schmegls on it.
Schmegls.
Another intellectual noun for you to add to your cooking vocab.
You're welcome.
 So then put the mushrooms on a baking sheet lined with foil.
Drizzle them with olive oil and sprinkle them with salt and pepper.
 Put them in a 450 oven for about 10 minutes, until they are soft but firm.


Take them out and smother in marinara sauce (recipe here) and copious amounts of cheese.
I used gouda because it's sooo goood-a.
I know, that was uncalled for and I apologize.
Traditionally it is mozzarella, but I'm so insane that I like to use whatever flavor I'm feeling that day...
or more honestly,
whatever I have waiting to be used up in the fridge.
Then grate tons of parmesan reggiano on top of your choice of cheese.
This is called mushroom PARMESAN after all!
Then put it back in the oven under the broiler for about 5 minutes until the cheese is bubbly and melty and ridiculously gorgeous.
Serve alongside some spaghetti and you've got yourself one outrageous meal!
Enjoy. 

Monday, May 14, 2012

Gorgonzola and Corn Relish


Sometimes the best meals are the easiest ones.
It's true I like to make my food from scratch when I can, but I have no shame in taking some help once in a while if I need it.
Enter Costco Turkey Burgers.
Those babies are something I've been trying to cut ties with for a while but the 'easy factor' is just too..
well..
easy!
And the fam loves them!
They're easy peasy 1..2..3.
But trying to spruce them up with something other than boring old tomatoes and lettuce is a challenge I look forward to.
Well, the other night, I came up with this delicious relish to blanket the burgers in.


Pretty much only 4 ingredients.
Gorgonzola cheese.
Corn.
Cilantro.
and a squeeze of Lime.
That's it.
Well, salt, pepper and olive oil of course, but those are staples and I can't be bothered to include them.
;)
I topped each burger with this little medley of flavors and the family LOVED it.
The hubs was really digging it.
You know he's loving something when you hear him pondering over each bite.
There were noises and lip licking coming from him that was bordering inappropriate for
 the dinner table.
But you know that I loved every minute of it!
I'm crazy like that.


The flavor burst was such a nice addition to the boring flavor of the turkey... 
or so he told me.

You can add this to just about any sandwich you like.
You can also play with the ingredients a bit.
If you don't love gorgonzola, you can use feta or goat cheese.
If you're not down with cilantro, ( in which case, see you later) sub in some basil or parsley.
You can add sun dried tomatoes, or some olives.
It's all good.  Get creative with it.
It will still look and taste amazeballs!
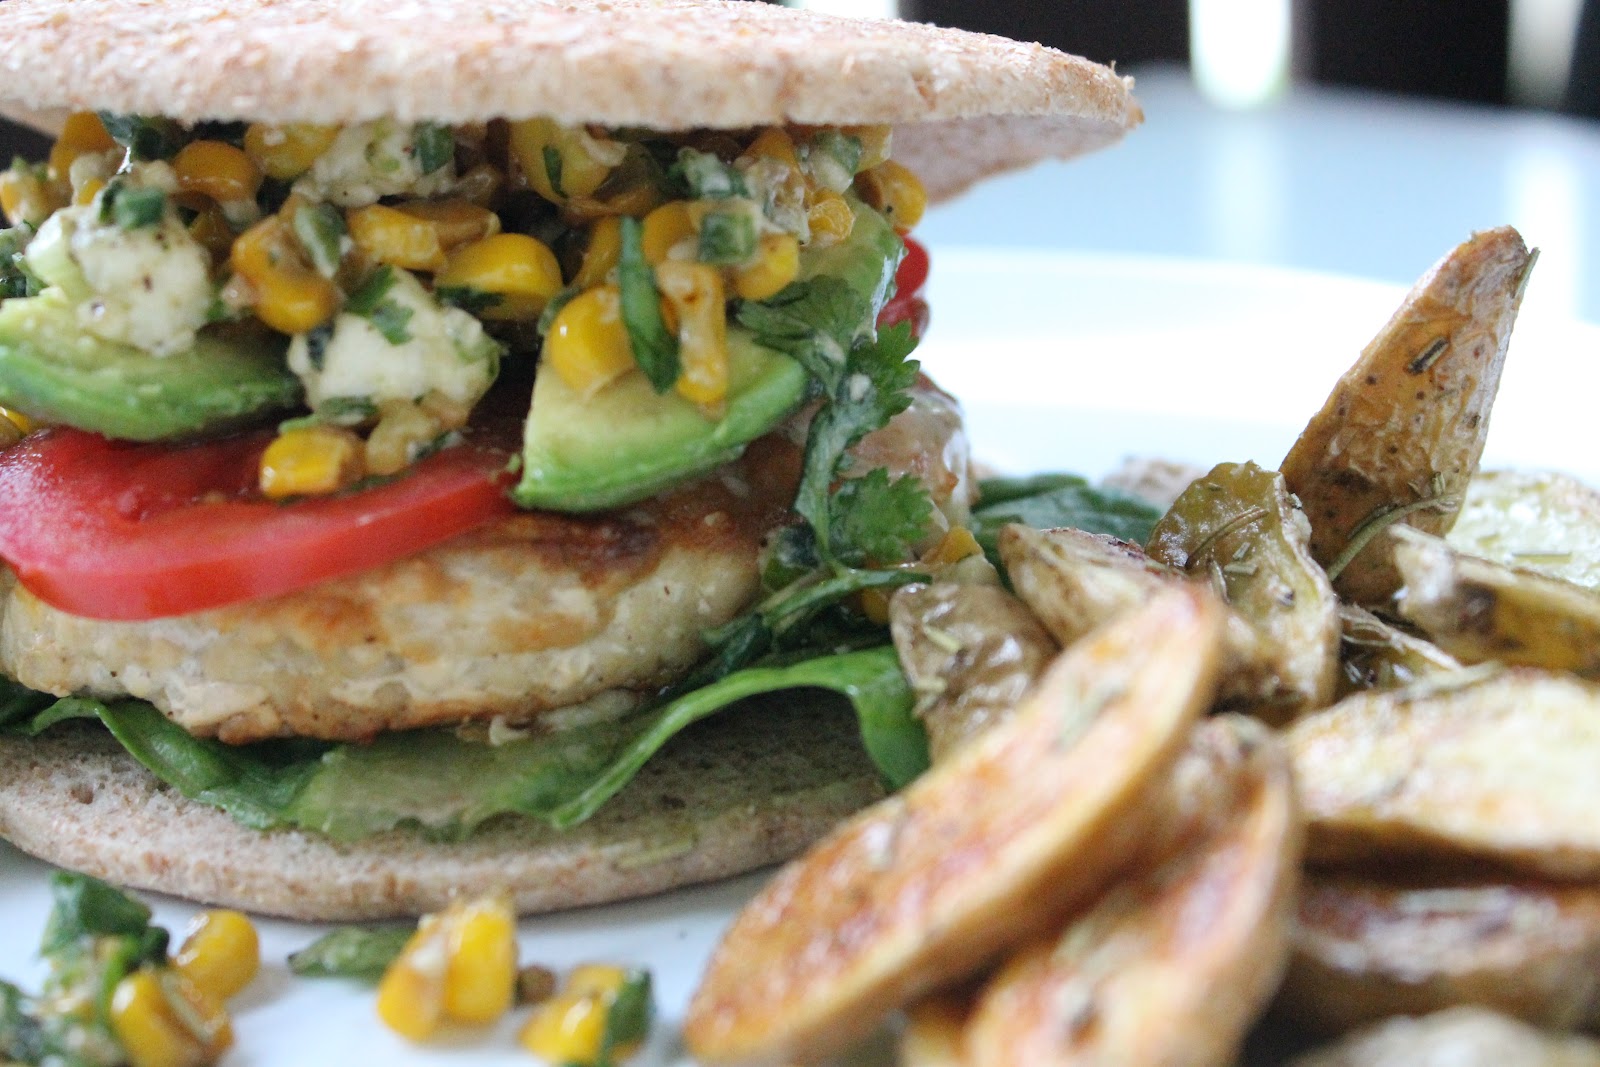
I made myself a salmon burger (yes, from Costco) and topped it with the gorgonzola and corn relish.
It was divine!
Such a vibrant compliment of flavors.
I served it alongside some rosemary fingerling roasted potatoes and the meal was complete.
Easy AND healthy.
Man, I love when that happens!
And I basically took the family on a trip to flavor town.
Free of charge.
So it was a winner any way you look at it.
I love when something so simple can be turned into something special with just a few little ingredients.
I know I love strange things, but this is how I am.
Deal with it, people!


Try it!!!
Eat it!!!
I'm almost positive you will try and find me to give me a big smooch because I will have changed your burger/sandwich experience forever.
With just a few simple ingredients.
And I will let you.

Nom nom nom!


Gorgonzola and Corn Relish
Serves 4 burgers (I'm pretty sure)

1/2 cup gorgonzola cheese, crumbled
1 cup corn kernels, frozen or fresh
1/2 bunch cilantro, cleaned and chopped
salt
pepper
olive oil
1/2 lime, squeezed

In a skillet over medium high heat, saute the corn in about 2 tablespoons olive oil until charred and cooked.  Season with salt and pepper.  
Turn off the heat and stir in the cilantro.
Mix all together.
Stir in gorgonzola cheese and squeeze in 1/2 lime.
Taste for seasoning ( may need more salt and/or pepper according to your taste buds)

Put this on any burger you like and enjoy.

Monday, May 7, 2012

Cruz's Ombre Cake

My beautiful, gorgeous, amazing, precious baby sister is pregnant.


She's pregnant with her very first baby.
A little boy.
I am partial to boys. 
Obvs.


My mom (aka my hero) and I have been planning for this day forever.
I really never thought this day would come.
Why you ask?


Well, one example is that she is extremely selfish.
Not in the gross rude way you may think.
She's the most generous person you will ever meet, but when it comes to getting some sleep, then she's not giving that up for anything.... or anyone!
She can't be woken up early for a crying baby either (ahem... mine, for example).
The girl loves to take naps at any given moment of the day.
Like seriously...
any.
given.
moment.
She can be hanging out and talking one minute and then next, she's snoozing on the couch, catching up on her beauty sleep.
That girl loves her beauty sleep.


It doesn't matter where she's at or who's around, if she's tired, she's going to lay that pretty little head down and catch some zzzzz's.
That's one of the things I love so much about her.
She does her own thing and doesn't care what people think.
If she's sleepy at 1:30 in the afternoon in the middle of a conversation, 
well then she's going to take a nap, damnit!


My mom and sister in law (who I really consider my sister, so we can just take off the 'in law' part now) and myself all put together a cinco de Mayo themed baby shower with paper airplane accents.
It turned out so pretty and colorful.
I knew I had to make a spectacular cake to keep up with all the fabulosity that we had planned.


At first my mom thought we should order a cake since there were so many people invited ...
90 in all!
But I really didn't want to do that and thought that we could make one for less money and please...
anything made from scratch is always better and more meaningful, in my opinion.


I researched and researched what kind of cake I was going to make.
I thought for a while that I wanted to make a rainbow cake.
I just thought it would be fun and festive and ... well...
colorful.
But then, a lightbulb went off in my head and I thought...
Ombre!!
Ombre blue cake!
That sounds like a fun cake!


So I got to researching, and there are some beautiful ombre blue cakes out there.
I decided to go my own way, make the cake from scratch (of course, because there's something physically wrong with me to where I cannot purchase a boxed cake mix for the life of me!) and see how it turns out.
And this is what it looked like.


I was so pleased, and impressed with myself.
Let's get this straight.
I'm a cook.
Not a baker.
I like to bake cookies here and there, but I consider myself a cook and can get pretty creative with that.
But baking...
and cake decorating...
and frosting making...
that's a whole different story.
But it's always fun to try different things and challenge myself in the kitchen.
And so I was unafraid and completely intrigued with the idea of making this ombre cake with four different cake batters and four different shades of blue and four different shades of sprinkles to decorate the cake with.
AND make my own buttercream frosting (which, in my opinion turned out a tad too sweet for my taste buds, but my hubby loved it, so that's good enough for me!)


I baked the four layers individually in a 12X18 baking sheet, frosted and stacked them and gave it the 'crumb frosting' layer the night before the party.  That basically means you frost the cake with a really thin layer of frosting which will get all crumby and ugly.  But then the next morning, you take it out of the refrigerator and frost it generously with more buttercream frosting and you will be left with no crumbs!
It's a pretty essential step of cake decorating in the elimination of crumbs process.


I cut out a chevron pattern on some paper and carefully placed it onto the cake.
I sprinkled each layer with my different colors and textures of sprinkles.
I'm gonna be honest.
That part was horrifying !!
It was soooo much harder than I anticipated...
sprinkles sprinkling all over the place.
Rolling off the sides, sticking in places it wasn't supposed to be sticking in.
But in the end, it was well worth it.
No pain, no gain I always say.
Well, I never really say that but some people do and I agree with them.


I really love how this cake turned out.
I think the super trendy and fun chevron pattern that my sister is obsessed with right now was the perfect detail for her special cake.
It's so pretty and I was really proud.
Maybe a little too proud.
I was trying to get everyone's attention at the shower to make sure they saw the cake before I cut into it.
I was acting a little crazy, but you know what..
my creations are my babies.
And gosh darnit, I am a very proud Moma!

The recipe I used for the cakes is here.
The rest, you buy colored food dye, sprinkles, and a Bible.
Pray to God that it all turns out the way you want!
That's the best advice I have for you.
Now go on and get to praying and baking!

Mushroom and Artichoke Shepherd's Pie with Mashed Potato Crust


It's no secret that I love comfort foods.
I love a big, steamy bowl of something topped with gorgeous mashed potatoes that fills my belly and makes me feel like a kid again.
Anything with mashed potatoes seems to do the trick for me.
That always feels like a big hug in my belly.
That sounds weird.
Anyway, what I really love is trying to take a classic comfort food and make it semi healthy.
Then, I'm really in love.
A vegetarian shepherd's pie is what's on the menu for tonight.
I think I've already posted some sort of shepherd's pie on here somewhere, but this one was so 
good, I couldn't resist sharing it with you guys.
And by 'you guys' I mean all three of you who are reading this.
:p


This type of meal is a great 'make ahead' meal, too.
You can assemble everything, down to the last detail and then cover it up and put it in the fridge until
you're ready to bake it and serve it.
I absolutely love those kinds of meals.
It's all about the time management, people.
With three kids and a crazy busy schedule, it's always nice to have dinner made and waiting for me, instead of the other way around.
It's not often that happens, but when it does, man does that feel amazeballs!
I recommend everyone try it... at least once!
So why not start right here, right now, with this here meal.


As with every other meal, I always try and serve a salad alongside it.
That's how my Moma did it, and gosh darn, that's how I'm doing it!
My salads just seem a tad fancier than the good ol' iceberg that Moma had.
If it wasn't tabouli, it was an iceberg lettuce salad.
And believe me, there ain't nothing wrong with the old iceberg.
It's delicious, and a comfort food in and of itself!
Come to think of it, do they even sell iceberg lettuce anymore?
I can't remember the last time I saw it in the store.
It's all about the wild rocket and mixed greens now.
We're so fancy now, right?


Note to self...
Check for iceberg lettuce next grocery trip and try and make it sexy again.
Oh yeahhhh.


Until then, here is the (pretty much) how-to on getting some of this down home comfort food deliciousness on your table and into your own mouth!

Cremini Mushroom and Artichoke Heart Shepherd's Pie

2 lbs. cremini mushrooms, cleaned and roughly chopped
1 bag frozen artichoke hearts, or 1 can artichoke hearts ( I get mine from Trader Joe's)
1 cup fresh or frozen peas
1 cup fresh or frozen corn kernels
2 carrots, diced
2 celery stalks, diced
4 garlic cloves, minced
1 1/2 teaspoon herbs de provence (if you don't have that, you can use 1 teaspoon dried thyme)
1 yellow onion, diced
olive oil
3 tablespoons flour
1 1/2 cups veggie stock
1 1/2 cups milk
salt and pepper 

In a large saute pan over medium high heat, put about 4 tablespoons olive oil and add in the mushrooms.
Saute the mushrooms until they caramelize.  Add salt and and pepper and remove from the pan into a side dish.
In the same saute pan, add in the artichoke hearts with some a couple more tablespoons olive oil.  Season with salt and pepper.  Saute them until they caramelize as well.  Put them in the side dish with the mushrooms and set aside.
Put a few more tablespoons olive oil into the saute pan and add in the carrots, celery and onions.  Season them with salt and pepper.
Saute for about 5 minutes over medium heat.  Add in the garlic and herbs de provence and saute for another 3-4 minutes.  
Put the mushrooms and artichokes into the pan with the other veggies and mix all around.
Make sure there is at least 2 tablespoons of olive oil in the pan and sprinkle in the flour all over the veggies.
Cook that around for about 1 minute on medium heat and slowly add all the veggie stock while mixing with your spoon or spatula.
The mixture will start to thicken right away.  Next, add in the milk while continuing to stir your veggie mixture.  Keep adding liquid until the mixture can coat the back of a wooden spoon and when you swipe a finger across the wooden spoon, the sauce holds its shape (meaning it doesn't come back together).
I hope that makes sense.
The mixture won't reach it's full thickening potential until it comes to a boil... a very low boil.
Once it does, turn the heat down and add in the peas and corn.
Check again and season with salt and pepper.
Pour it into a baking dish and prepare to have your dish get even more luxurious by a mashed potato topping.

Mashed Potato Crust
4-5 russet idaho potatoes, peeled and diced
2 garlic cloves, minced
1/2 cup low fat sour cream
1 cup buttermilk 
2 tablespoons butter
Salt and pepper

Boil the potatoes until fork tender.
Drain and put back into the same pot.
Mash it (or put it through a ricer if you don't like lumps) and add in the butter, sour cream, buttermilk, garlic cloves and salt and pepper.
If the mixture seems too dry, add some more buttermilk.
I will also sometimes add some olive oil to moisten it.
Put dollops of the potatoes all over the mushroom and artichoke filling and using a spatula, carefully spread the mashed potatoes all over the top of the veggies.  Top with a little bit of cheddar cheese and a lot bit of parmesan reggiano. 
It will create a beautiful and delicious crust on the potatoes and you will think you will have died and gone to heaven when you bite into that baby.

Serve with a (iceberg?) salad and you will love everything about this entire dish.
ev.
ree.
thing.


Monday, April 30, 2012

OC Family write up...

Check out my flattering little feature over at OC Family.
I was honored to have Amanda do this piece on me.
And the fact that I inspired her to cook a bit more healthfully and naturally...
Well, that excited me a little more than I care to admit!

Sunday, April 29, 2012

Bobby and Giada via Rachael

Food Legends: Family Edition

I saw a promo that Rachael Ray was going to have Bobby Flay and Giada DeLaurentiis on her show the other day and I was so excited.
I mean like, ridiculous excited.
I was literally smiling from ear to ear.
Set my timer for my DVR to record the show.
Checked and double checked again that it was really set up correctly.
It was sad, really.

And even though Rachael Ray BUGS me beyond belief, I will still watch her occasionally, if she's on the Food Network.
 Rarely, but occasionally I will catch a show.
Pretty much the only thing I watch on TV (when I actually have time to watch TV) about 90% of the time, is the Food Network.
 So whatever is playing when I'm watching, if I've got the time to watch, I'll watch it.
After all it is cooking food, right?
And that's really all I care about anyway.
I never watch her show on regular TV, but the other day for some reason it was on and I saw that she was having a family episode with Bobby Flay and Giada DeLaurentiis.
And I love me some Bobby Flay.
And Giada?
She's so bubbly and cute and... smiley.
They are a couple of my food idols.
And I love to know about people's 'behind the scenes'.
That's definitely the voyeur in me.
Anyway, I watched it and I loved it.
Then I made my husband watch it with me again that night.
He loved that.
(insert sarcasm here)

Check out the promo.

It was def worth the watch for this Food Network addict.

Goat Cheese Stuffed Chicken with Quinoa Stuffed Bell Pepper


I am a BIG fan of stuffing things.
Like saaaayyyyy... my face (for example).
I love stuffing my face with all kinds of delicious goodies.
Here is a recipe I put together for dinner for my fam and it was just delightful.
A perfect food for stuffing my face!


Even though I don't eat chicken, I still have a hard time just sauteing up some boring old chicken and  serving it up to the boys.
I just can't do it.
It's too boring!
It's like, against my religion or something.
So I'm always trying to think of different ways to make it fun and interesting.


I decided to stuff the chicken with some goat cheese and sun dried tomatoes.
It really sounds fancier than it is.
It is so easy to stuff a chicken breast.
I mean, c'mon.
Those breasts are just screaming to be stuffed.
It's like high school all over again.
Or was it junior high?
I can't remember now.


Regardless, this stuffed breast will not disappoint.
And paired with the stuffed bell pepper.
It's a wonderfully balanced meal and a total hit.
Super flavorful and after you assemble everything, you throw it all in the oven and bake it off.
Easy.
Peasy.


And it goes a little something like this...

Goat Cheese Stuffed Chicken Breasts

2 medium to large chicken breasts, cut in half lengthwise 
4 tablespoons goat cheese
12 julienned pieces of sun dried tomatoes
4 basil leaves

Place the halved chicken breast on a piece of saran wrap.  
Cover it with another piece of saran wrap.
Take a meat mallot or something else you can bang it with, and start pounding out the chicken breast.
Not too hard so you break up the meat, but hard enough to start thinning it out.
When the chicken is nice and thin, put it to the side and season with salt and pepper.
Continue the same process with the remaining breasts.

To stuff them...
Lay out one breast.  Spread the goat cheese onto the lower middle section of the breast and top with a basil leaf.  Add 2-3 sun dried tomatoes slices on top of the basil. 
Roll the chicken breast up and away from you and tuck in the sides so the goat cheese doesn't spill out when you bake it.
It doesn't have to be perfect, but try and tuck the breast all under itself so there is no visibility of the filling.

Bake it at 400 for about 20 minutes, depending on your oven.
It's seriously some good eats!


Quinoa Stuffed Bell Pepper

2 Bell Peppers, preferably red, yellow or orange, cut lengthwise in half, seeded
2 cups quinoa, cooked 
1 lb. chopped mushrooms, cooked
1 medium onion, chopped
4 garlic cloves, minced
1 carrot, shredded
1 teaspoon allspice
2 cups chopped spinach, frozen, squeezed and drained
1 cup parmesan reggiano
1/2 cup chopped fresh parsley
1/2 cup chopped fresh basil
1 large beefsteak tomato, sliced
3/4 cup veggie or chicken broth

In a medium saute pan over medium high heat, heat 4 tablespoon olive oil and toss in the chopped onion.  Salt and pepper. 
Move that around for about 4 minutes.  Add the shredded carrots.  Salt and pepper.  Saute for 2 minutes.  Add in the allspice and chopped mushrooms.  Salt and pepper them.
Saute for about 7 minutes on medium high heat.  Toss in the garlic.  Saute for about 3 minutes more.
Put the spinach in there and give it a final couple minute toss around.
Put the entire mixture into a large bowl and let cool.  Add in the quinoa and chopped herbs and mix thoroughly.  If you want you can add any cheese you like at this point.  I added about 1/2 cup of parmesan reggiano to the mix.

Put the split and seeded bell peppers onto a baking sheet and coat them with olive oil, salt and pepper.
Stuff them with the quinoa mixture and top them with remaining parmesan cheese.
Put the sliced tomatoes on the baking sheet and place the bell peppers on top of each tomato slice.
Add about a 1/2-3/4 cup of veggie broth (or chicken broth) and cover with foil.
Let bake at 425 covered, for about 20 minutes.
Uncover and let bake an additional 5-10 minutes, until the peppers are roasted and softened. 

Serve with the stuffed chicken breast and VOILA!! 
A delicious and healthy dinner for your loved peeps.

Enjoy!!
We sure did.


Disclaimer:
The lighting for these pictures was HORRIBLE.
I know.
I'm still learning.
Everyday.
Trying to figure out how to get pretty pictures.
This one was a fail.
And I'm aware.
But I will keep on keeping on and hopefully my pictures will get better and prettier!