Thursday, December 22, 2011

Gingerbread Cake with Cinnamon Buttercream Frosting

I recently volunteered at my son's school to bake a gingerbread cake for their gingerbread party. My good friend and neighbor (who is an amazing baker, BTW) emailed me a recipe for a gingerbread cake that is so good, I had to share with you!


I have never thought to make a gingerbread CAKE. I've heard of gingerbread cookies or gingerbread houses, but not gingerbread cakes. I was intrigued and excited to try it out.
I am already a HUGE fan of spice cakes, so I knew that I was going to enjoy this one.
Unfortunately, I was baking the cake for his class and there wasn't a way for me to secretly take a slice and eat it for myself (although I did get after every little crumb I could find).


I decided to bake this cake again and take it with me to my cousin's house.
We were invited over for dinner and I thought it would be the perfect place for us to debut this festive and unique cake.
Instead of making the Lemon Icing that the recipe calls for, I decided to make a cinnamon buttercream frosting instead.
I mean, cinnamon and gingerbread... that sounded like the dream team of flavor combos to me.

When I baked the cake, I did make a few adjustments.
I divided the batter evenly into two 9 inch rounds instead of putting it all in one pan.
Since I divided them up they only needed to cook for about 37 minutes instead of the 40-45 the recipe calls for.
When the cakes were completely cooled, I cut them in half lengthwise with a serrated knife.
I stacked them and layered them with the cinnamon buttercream frosting.
**Make sure they are completely cooled before spreading on the icing!!
I love the rustic look of a cake when the frosting is overflowing from each layer.
It not only looks gorgeous, but it also has a very inviting and comforting feel.

You can find the recipe here at Joy of Baking.
Note: I omitted the lemon zest that the recipe calls for because I knew I wasn't going the make the Lemon Icing to go with it.

This cake is some serious good eats. My son's class loved it, my family loved it and my cousin and his family loved it. I would say that 3 for 3 ain't bad odds.
So if I was a betting woman, I would bet that if you made it, you would love it, too!
Just saying.

Cinnamon Buttercream Frosting:
3-4 cups powdered sugar
1 stick butter, room temp
2 tablespoons (or more) cinnamon
1/4 cup-1/2 cup milk

Beat butter with mixer then add powdered sugar, 1 cup at a time. Add cinnamon and beat till incorporated. Add milk a few tablespoons at a time until it turns into a frosting.

Friday, December 2, 2011

Cinnamon Pull Apart Bread

I recently joined Pinterest thanks to a few of my girlfriends telling me about it.
Normally, I'm always out of the loop with anything having to do with social media.
But Pinterest I am loving.
[you can follow me... just click the button ---> ;)]
Anyway, one recipe that I kept seeing over and over again on there was this one for a Cinnamon Pull Apart Bread.
It sounded so good and I'm a HUGE fan of cinnamon, so I couldn't pass it up.
This recipe is one of those that takes a classic recipe and simplifies it just a little.
It tastes like a cinnamon roll but it is baked in a loaf pan and pulls apart when it's all baked and done.
Delicious doesn't even begin to describe this 'bread'.
And really, what's not to love about your house filling with the intoxicating scent of cinnamon.


I had my little pseu chef helping me out this AM.
He loves to help in the kitchen.
Incidentally, he also loves to make a mess in the kitchen.
So, it works out for him.
Me, not so much.
But I do love having him help me out!
There was a ton of sugar and cinnamon to spread around the dough.

And he loved getting right in there and shmearing it all around.
What?
Haven't you ever heard of schmearing?
It's a technical term...
look it up.

The picture above is what this beauty looked like before going into the oven.

And this lovely lady is the 'after' shot. Can't you just SMELL the cinnamon through your screen?


It gets all puffed and delicious and crispy on top...

And gooey and soft and doughy in the middle.
It's this wonderful texture of soft and crunchy.

It is definitely going to be making an appearance at my house on Christmas morning...
and maybe even before that.
It's just too good!

You can find the recipe from Joy the Baker here.

Tuesday, November 22, 2011

Beet Pesto

I love beets. I know I've already said this but I really do!
I had to share with you another recipe that I absolutely love to make.
It's a Beet Pesto that is absolutely gorge.
The color, the texture, the nutritional value of a beet; it's pretty much the perfect vegetable, in my opinion.
You can use the beet pesto in so many different ways.
I put it in orzo for my Cornmeal Crusted Snapper recipe.
I've put it on a piece of crusty baguette and topped it with some really good parmesano reggiano cheese.
I've even put it in the couscous salad that I love to make...

Just a few simple ingredients and you have a vibrant and ruby red puree of goodness you can use every which way your imagination allows you to.

The recipe is from design*sponge and you can find it here, although I did make a few changes to make it my own!
I really can't resist basil in a pesto, well in just about anything really, so I added some to mine, about 1/2 a cup. My brother always makes fun of me whenever I tell him I'm cooking anything he says, 'Is there basil in it?' I really love me some basil.
I love having a fresh herb in my recipes whenever I can fit it in.
Of course I used more than 1 garlic clove. I mean, c'mon, it's me we're talking about here.
I used 2 large garlic cloves.
Well, maybe three... but who's counting?
Oh you are? Ok, then I used three, but two would be plenty for those less excited to smell like garlic for the next two days.
I roasted the beets on 425 in foil drizzled with olive oil, salt and pepper for about 40 minutes.
I think they have much more flavor when you roast them rather than boil them.
I also used a tad more than 2 ounces of almonds. I used about 1/2 a cup and I also roasted my almonds. Again, more flavor. It makes a difference. Trust.

Here I put it on some pasta... and it was insanely good.

I used whole wheat spaghetti which also adds another nutty element to the dish.
If you're feeling particularly indulgent, you can even add some heavy cream to the pesto. This will make for a creamy pasta sauce and adds a little richness to the dish. It's the bomb.com.
This delicious bowl of beet pesto pasta was not only an easy lunch, but the gorgeousness of the dish is undeniable.
You know how they say you eat with your eyes first?
Well, this dish really got me excited.
Even Lucas told me after I tasted the pesto,
'Mom, when you really love something, your eyes always roll in your head.'
Oops, maybe I get a little TOO excited for food! heehee.

Of course you can't have a steaming bowl of pasta without some garlic bread, so I made some on the fly. Perfect compliment to the dish and I am now totally in love with this new recipe.
The kids loved it and ate it all up.
I am sure you will love this and your kids will too!!

Saturday, November 19, 2011

Cornmeal Crusted Snapper with Beet Pesto Orzo

I am a huge seafood fan. In fact, I only eat seafood.
I don't eat chicken or beef or turkey, or any other animal with legs.
I prefer to nosh on critters that come out of the ocean.
I am a rare breed of pescatarian, though.
Meaning that even though I don't eat 'the meat', I will still cook 'the meat' for my family.
Props to me, dontcha think?
I do.
I like to give myself a silent pat on the back everytime I touch 'the meat'.
Is this starting to sound a little x rated or is it just me?
Let's move on.

Ironically, this post has nothing to do with 'the meat'.
This post is all about the SNAPPER.
And not just any snapper, but the cornmeal crusted red snapper.
A delicious delight in your mouth.
And really easy to do.

I simply mixed 1/2 cup of cornmeal, 1/2 cup of flour, 1 tablespoon granulated garlic, 1 teaspoon onion powder, 1 1/2 teaspoon paprika, 1 teaspoon salt and 1/2 teaspoon fresh cracked pepper all together in a shallow dish.


Then I took my red snapper filets, about 4 of them, and dredged them in the cornmeal mixture.
Make sure you pat the cornmeal onto the snapper so it sticks.
Then I just pan fried them in a little bit of olive oil on medium high heat until they were golden brown and cooked through, about 5-7 minutes.

They were light and crispy and flavorful and beautiful. You need to cornmeal crust your fish next time you cook it. It's truly a fabulous texture in your mouth.

After they were done frying, I topped each filet with some lime zest and a little squeeze of lime juice. This adds an incredible amount of citrus essence to the fish and elevates the flavors to another level.
I like to put a wedge of lime on the plate as well in case you like even more citrus on top.
My sides were a beet pesto orzo to go along with it and some roasted vegetables.
Those recipes to follow at another time!
Healthy, fresh and gorgeous! You can't go wrong with that beet pesto orzo, too!
I promise this snapper is so easy to do. If you make it, let me know if you liked it.
I have a feeling you might! ;)
Happy (almost) Thanksgiving!

Thursday, November 17, 2011

Stuffed Zucchini with Lemon Pasta


Stuffed food is fun, is it not?
Stuffed peppers, stuffed mushrooms, stuffed anything!
I had lots of zucchini in my fridge and I was trying to decide what to do with it.
I finally decided to stuff the zucchini with a mixture of mushroom, carrots, onions and quinoa.


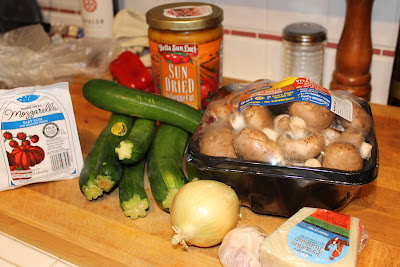
Here is what you will need to get this dinner party started...

The ingredients:

Quinoa is this fantastic seed (most people think it's a grain, but actually it's a seed) that is highly nutritious, and delicious!
Actually, it's pretty flavorless and will take on whatever flavor you cook with it.
It's a great alternative to rice or cous cous.


In this dish, I cooked the quinoa 'risotto style'. I added it raw to the mushroom mixture and kept adding liquid until it was cooked through.
It was light and fluffy and oh so good.

Here is what the zucchini looks like when they are hollowed out...
Ready to be stuffed!


Stuffed and topped with marinara... mmmmmm.


Fresh out the oven!
All that melty, cheesy deliciousness.

Sooo zexy!


Digging in!
I served it with a lemon and sun dried tomato pasta.
It was the perfect compliment.

It not only tastes good, but looks so pretty on the plate, too!


Here's the smack down on my 'guess'timations:

Zucchini Boats

1/2 cup quinoa
1 to 1 1/2 cup of veggie or chicken stock
1 lb mushrooms
1 small carrot
1 small onion
4 garlic cloves
6-8 zucchini, cut in half lengthwise and flesh removed with spoon
1/2 cup grated pecorino romano
marinara sauce, optional spooned over each zucchini half
1 cup mozzarella cheese, shredded

Put the onions and garlic in the food processor and pulsed them until just chopped coarsely. Then put them in a hot saute pan on medium heat with olive oil.
Put the flesh of the zucchini and carrots together in the food processor and chopped them finely. Add that to the pan with the onions and garlic. Season with salt and pepper.
Add the mushrooms in the food processor and pulse them until they are coarsely chopped and add those to the pan. Saute it all for about 7-9 minutes and taste for seasoning.
Add the quinoa right into the pan and mix it altogether.
Add veggie stock a 1/4 cup at a time.
Keep stirring and adding stock to the pan as the stock gets absorbed by the quinoa (like risotto).
When the quinoa is cooked (takes about 20 minutes to cook), turn the fire off and let the mixture cool.
Make sure you taste for seasoning.
When the mixture is cooled, fill the zucchini boats generously and place in a baking dish that has marinara sauce on the bottom so the zucchini doesn't stick.
Repeat this until all the zucchini boats are filled and placed in the baking dish.
Cover the zucchini boats with more marinara sauce and top it all with mozzarella cheese and pecorino romano.

Cover with foil and bake in the oven for 20-25 minutes on 375 until the zucchini boats are just tender.
Serve with lemon pasta.


Lemon and Sun Dried Tomato Pasta

1/2 cup sun dried tomatoes, julienned
1/4-1/2 cup fresh squeezed lemon juice
4-5 garlic cloves, minced
2 tablespoons butter
1/4 cup olive oil
Veggie stock, as needed
1/2 - 1 cup Parmesan Reggiano, freshly grated
1 lb. whole wheat spaghetti, cooked and drained

In a large saute pan, melt butter and olive oil together. Add garlic and let cook for 3-5 minutes over medium heat.
Add the sun dried tomatoes and lemon juice and season with salt and pepper.
Add the cooked spaghetti and toss in the sauce. If the pasta is too dry, add more olive oil or veggie stock. Make sure you keep tasting for seasoning to make sure it's perfect.
Toss the pasta in with at least 1/2 cup of the parmesan cheese and (if my calculations are at all correct) you should have a delicious and lemony spaghetti that will go perfectly with the zucchini!

Wednesday, November 16, 2011

Eggplant, Mushroom and Asparagus Pizza with Roasted Tomato Sauce


I made the easiest pizza sauce ever the other day.
No, seriously.
Easy Peasy.
I had some tomatoes that were going soft and I knew I had to use them up before they were lost forever. I really have a hard time with throwing food away so I'm always trying to salvage whenever I can.
This actually helps me in coming up with new recipes because I wouldn't have thought to do this with a ripe tomato. Mainly because I'm weird and using a perfectly good ripe tomato to try and make it soft would seem silly to me, but again... I'm weird like that.


I cut up all the soft tomatoes I had, about 10 of them, and cut one onion in chunks and peeled about 4 cloves of garlic. I put it all on a baking sheet and drizzled olive oil all over and seasoned with salt and pepper.


Then I put it in a really hot oven, like 500 degrees for about 10-15 minutes, until the tomatoes and onions caramelized and got sweet and delicious...
It was heaven on a baking sheet.
I wish I took a picture of it but of course, I got sidetracked with something else (probably one of the munchkins pulling on my leg asking for something to eat... is it just me or are boys ALWAYS ALWAYS ALWAYS hungry?? It's exhausting. Sheesh.).
Sorry, I digress.
Anyway, back to the sauce makin'.


After I took the tomatoes out of the oven, I sprinkled about 2 tablespoons of fresh oregano on top.
If you don't have fresh, you can use dried oregano, about 1 tablespoon.
When the tomatoes, onion, oregano and garlic cooled down, I put it all in a food processor and pureed them to a smooth and thick sauce.
Check for seasoning and it's ready to slather onto any pizza dough you have.

Sidenote:
You will probably have left overs that would be perfect in a tomato soup (which I made with my leftovers). I highly recommend you do that, too!

For the dough, I made a basic recipe that I use for just about all my dough recipes.
It's the same one I use for my Focaccia Bread.

Then you can basically top your pizza with whatever you like.
For this delightful pie, I used about 1 lb. cremini mushrooms, sliced, 1 bunch of asparagus cut in thirds, and 1 whole eggplant cut into thin slices.
I sauteed the mushrooms in a little olive oil, salt and pepper before topping them on the pizza because I like a little crust on my mushrooms.
The asparagus and eggplant I put on the pizza raw and drizzled some olive oil on top.
They roasted and caramelized in the oven while the pizza cooked.
(my mouth might be watering a little... )
I used fontina and mozzarella cheeses for this and the flavor combination was perfection with the roasted vegetables.
This is a serious vegetarian pizza.
But the best part is, it is so filling and hearty, you'll never miss the meat.

So it looks like it's pizza for dinner tonight, party people!

Or lunch.
or breakfast.

I mean, c'mon... who doesn't love them some pizza?!
Anytime.
Anywhere.
Anyway!
your welcome.

Roasted Beet and White Bean Salad

I love beets.
LOVE me some beets.
I also love to make holiday-ish food this time of year.
Meaning the flavors and colors of my food are a big deal to me.
I make sure that the house smells and looks like the holidays.
I like to get into the spirit of things!
So I thought my Beet and White Bean Salad would be perfect for your next holiday get together.
It's SUPER easy and looks gorgeous.
The colors just look like the holidays to me.


And really, who doesn't love an easy salad? It's so easy and so delicious.
Not to mention healthy.
It's a win win, right?!
Right.


The colors are so festive, aren't they?
The gorgeous ruby red from the roasted beets, the beautiful creamy white beans, and the bright pop from the parsley.
It's a beautiful addition to any table.
Ok, I think I've sufficiently sold this salad to you.
Now, go make it!
:)

Roasted Beet and White Bean Salad

4-5 whole beets, peeled and quartered
1 - 15 oz. can of white cannellini beans, drained and rinsed
1/2 bunch of parsley, chopped
1 lemon
olive oil
salt and pepper

Heat oven to 425.
Put the beets in foil and drizzle with olive oil, salt and pepper and wrap them tightly.
You can probably fit 1-2 whole beets per piece of foil, depending on how big a piece of foil you cut.
Put the beets wrapped in foil in a large baking sheet and roast for about 30-40 minutes, until fork tender.
Let cool.
Make the dressing:
Mix lemon juice, olive oil (1 part lemon to 2 parts oil) and salt and pepper together.
I make this a layered salad because the beets will turn the white beans purple. That is perfectly ok but I love the way it looks layered, but you can mix it up if you like.
After the beets cool, I cut them into bite sized pieces and toss them with some of the dressing.
Layer that on a white plate.
Then take the beans and toss them in some dressing and scatter them right on top of the beets.
Then take the chopped parsley and put them all over the beans. The parsley is meant to be an ingredient, not just a garnish, so don't be afraid!
Then drizzle a little bit more dressing right over the entire salad.
Enjoy!


Monday, November 14, 2011

Butternut Squash Shepherd's Pie

In honor of the upcoming holidays and the gorgeous winter squashes out in all the stores right now, I am coming at you with another butternut squash recipe. It's just such a versatile squash and I love it so much that I play with it a lot in my cooking.
Here I have a butternut squash shepherd's pie.

It's completely vegetarian and completely delicious!

So I started by chopping carrots, celery, onion (mirepoix) and garlic. You just want them to be cut into similar sizes and bite sized pieces.

I peeled, seeded and diced a whole butternut squash (about 1 1/2 - 2 lbs) into about 1/2 to 3/4 inch cubes. I steamed it in a big pan on medium low heat with a little veggie stock until they were al dente.
You can also just throw the diced and cubed BNS in the oven and roast it on high until al dente, if you prefer. I just wanted to keep and eye on them and make sure they didn't cook for too long or else they would have turned into a butternut squash mash in the filling.
Not cute.
PS that picture up there is of my sister 'helping' me cook. This is her version of stirring... a spatula in one hand and iPhone in the other. Gotta love her.

Then I removed the BNS from the pan and set it aside. I added about 4-5 tablespoons of olive oil and sauteed the onions, carrots, celery and garlic and added about 1 tablespoon of dried thyme and salt and pepper for about 5 minutes on medium to medium high heat.

Then I added 2 heaping tablespoons of flour over all the veggies and oil and mixed it around.
Make sure everything is coated with the flour and oil and keep everything moving for about 1 minute so the flour taste has time to cook out a bit.
Then I added veggie stock slowly, about 1/2 cup at a time, while stirring until my mixture reached the consistency that I wanted. You want it to be thick like a good gravy but not so thick that it's like paste.
Add the stock slowly because you don't want it to be too loose or it can turn too soupy.
You will need about 3 cups of stock altogether.
Make sure you are checking for seasoning (salt and pepper) along the way, always!

Then I added the BNS back into the pan and added about 1/2 cup of frozen peas. You can add more or less, depending on what you like. I like to have peas in every bite!

Then I made some delicious buttermilk mashed potatoes and topped each mini 'pie' with.
I baked them in the oven for about 10 minutes until it was golden on top and bubbly inside.
Per-fection!
It is comfort food at its finest and it was a really amazing dinner!
The butternut squash works really well here in place of chicken, too.
It's hearty, it's healthy and it's a 'make you feel good' kind of dish.
You can also put it in a big baking dish instead of individual bowls and top it with the mashed potatoes. Bake it in the oven for about 15 minutes on 350 until everything is bubbly and golden brown. You may want to dot the potatoes with more butter so they won't dry out in the oven.
I grated some pecorino romano on top of my lil guys.
Make it!!
I promise, you will LOVE it.
love.

Wednesday, September 28, 2011

Rosemary Focaccia Sandwiches

The other day I got the urge to bake some bread.
Yes, I do get the 'urge' to bake some bread.
I know I'm weird but ain't nothing I can do about it.
I LOVE baking bread.
My all time favorite bread to make and my go to when I get the itch is Focaccia.
I love making it and I love eating it.
And the kids love making it and eating it with me!
They love to watch the yeast take flight and do it's thing.

So after we made the dough and let it rise, I turned this..

Into This...
Rosemary Focaccia with caramelized onions, garlic, sun-dried
tomatoes and kalamata olives
(I put Asiago cheese on only half because I'm not eating dairy)
Into This..
Halibut Sandwich on a bed of spinach with roasted sweet potatoes and russet potatoes and roasted green beans.
And This..
Steak Sandwich
I'd say that's not bad for a Tuesday night dinner.

Rosemary Focaccia Bread:
1 pack active dry yeast
1 tablespoon honey
1 cup warm water
1/4 cup olive oil
1 teaspoon salt
fresh ground black pepper
2 stems rosemary, chopped
3-4 cups flour, as needed
Cornmeal for dusting

Toppings:
About 10 Kalamata Olives, chopped
2-3 garlic cloves, minced
1 large onion, diced
5-6 sun-dried tomatoes, sliced
1 teaspoon kosher salt
fresh ground black pepper
2 tablespoons fresh rosemary
Fresh grated Parmesan or any other hard cheese (Asiago, Romano, etc.) of your choice

Put the yeast in a bowl with the honey and water. Mix around then let the yeast do it's thing.
When the yeast becomes activated, slowly start adding the flour, 1/2 cup at a time.
After adding 1 cup of flour, add the salt, rosemary and olive oil.
Continue adding the rest of the flour and stop when the dough comes together into a ball without it being too sticky or too dry.
Coat the ball in some olive oil (to prevent a skin from forming) and loosely cover it with a (clean) kitchen towel and let rise 1-2 hours in a warm place (I put it in the microwave or the oven which are both OFF of course).
Coat a sheet pan with olive oil and cornmeal. Roll the dough out to the same shape as your pan (I use a baking sheet) to about 1/2 an inch thick and place your dough onto the pan.
Let it rise for another 15 minutes.
Meanwhile, caramelize the onions and chop all your toppings.

Preheat your oven to about 450.
Uncover the dough and dimple it with your fingers to make indentations all throughout the dough without going all the way through. This will help the ingredients stick and is classic for focaccia bread.
Sprinkle the garlic all over the dough, then the caramelized onions, then the rest of the ingredients.

Bake on the bottom rack of your oven for about 10-15 minutes, until the edges are golden brown and the dough is cooked through.

** The Focaccia Bread recipe is adapted from Tyler Florence's Fabulous Focaccia recipe you can find here.